

搜索到
56
篇与
moonjerx
的结果
-
 记忆力提升与训练指南 引言记忆力是人类学习新知、积累经验的重要能力之一。良好的记忆力有助于提高工作效率和个人成就。本指南汇集了一系列有关记忆训练的资源和技巧,旨在帮助读者提高记忆力并有效地学习新知识。相关资源无锡陶氏灵感培训有限公司天才密码超级记忆法超级学习法百度百科 - 记忆方法百度知道 - 记忆小窍门八种高效记忆方法及强化记忆的七个技巧记忆训练方法八种高效记忆方法设定训练目标 明确自己在一定时间内的任务量,提醒自己要集中注意力。经常进行这样的练习,可以在潜意识里留下深刻印象,从而提高学习质量。善于排除干扰 寻找安静的学习环境,避免外界干扰。同时,学习时尽量不要想其他事情,全心投入学习之中。讲究劳逸结合 人的记忆是有曲线的,合理安排休息时间,让学习成为一种乐趣而非负担。保持空间清净 学习时保持桌面整洁,有助于提高学习效率。学会理解记忆 将抽象的问题具体化,从理解的角度掌握知识。对于不需要理解的内容,如法律条文等,则可以直接记忆。经常回忆 学习完一章内容后,花些时间闭眼回想,检查自己的学习效果。采用多种手段来记忆 制作卡片、图表等便于携带的学习资料,利用碎片时间学习。其他有效方法 寻找个人的最佳记忆时间,调整饮食习惯等。强化记忆的七个技巧编口诀记忆法 利用汉字同音、谐音或编顺口溜的方式将所要记忆的内容浓缩成一两句话。数字组合记忆法 归纳总结以时间、百分比或金额为特征的数字内容,加深印象。缩字记忆法 取某些内容的关键字形成一句话,以点带面。列表格记忆法 对于复杂且相似的内容,可以通过列表的形式加深理解。对比记忆法 对于既是...又是...的知识点可以采取此类方法。归纳总结记忆法 做适当的归纳总结,收集相同类似的要点和重点,构建知识框架。情感调动记忆法 培养对所需记忆知识的好感,将其视为美好的事物,有助于加深记忆。其他参考资料快速提高记忆方法记忆训练例子记忆法种类右脑训练软件介绍右脑记忆方法记忆力训练PPT视频例子 - 老师上课形式视频例子 - 图形上课形式结语每个人的记忆方式都有所不同,找到最适合自己的方法至关重要。希望以上资源和技巧能够帮助你在学习过程中更加高效地掌握知识。不断实践和调整,你将能够显著提升自己的记忆力。
 -
在HTML中播放SWF文件 尽管Flash Player已被逐步淘汰,但在某些情况下,你可能仍然需要在网页上播放SWF文件。以下是两种常用的方法:使用HTML嵌入代码可以通过直接在HTML中使用 <object> 和 <param> 标签来嵌入SWF文件:字中字游戏.swf<object type="application/x-shockwave-flash" data="yourfile.swf" width="width_value" height="height_value"> <param name="movie" value="yourfile.swf" /> <param name="wmode" value="transparent" /> <a href="yourfile.swf">Download Flash</a> </object>说明data 属性指定SWF文件的路径。width 和 height 属性定义播放器的尺寸。<param> 标签用于设置SWF文件的参数。如果用户浏览器不支持Flash,则显示链接以供下载。使用JavaScript和HTML通过使用JavaScript库(例如 swfobject)来动态创建HTML元素并嵌入SWF文件:<div id="flashContent"> <a href="yourfile.swf">Download Flash</a> </div> <script type="text/javascript"> var swf_height = "height_value"; var swf_width = "width_value"; var swf_file = "yourfile.swf"; var params = { menu: "false", wmode: "transparent", scale: "noScale", salign: "t" }; var attributes = { id: "myAlternativeContent" }; swfobject.embedSWF( swf_file, "flashContent", swf_width, swf_height, "9.0.0", "expressInstall.swf", false, params, attributes ); </script>说明需要引入 swfobject 库(在实际应用中应包含 <script> 标签来加载该库)。embedSWF 函数用于嵌入SWF文件,并允许传递多个配置选项。swf_height 和 swf_width 定义播放器的尺寸。swf_file 指定SWF文件的路径。params 对象用于设置SWF文件的参数。attributes 对象定义额外的HTML属性。注意请确保替换示例中的 "yourfile.swf"、"width_value" 和 "height_value" 为实际值。由于Flash Player的安全性和支持问题,许多现代浏览器不再支持Flash内容。因此,建议使用HTML5的 <video> 标签或其他现代技术,如WebGL或WebAssembly,来替代Flash。以上就是两种常见的在HTML页面中播放SWF文件的方法。
-
忘记青龙面板密码的解决方法 如果您忘记了青龙面板的密码,不用担心,本文将向您介绍几种解决方法,帮助您找回或重置密码。通过SSH登录服务器或主机使用docker exec命令进入青龙面板容器使用docker exec命令可以进入青龙面板的Docker容器内部。docker exec -it qinglong bash注意:这里的qinglong是青龙面板容器的名字,如果在容器中查询不到,请确认青龙面板容器的实际名字。查看账号和密码一旦进入了容器内部,可以使用cat命令查看青龙面板的账号和密码。cat /ql/data/config/auth.json这个文件包含了青龙面板的登录信息。通过命令查看账号密码使用宝塔面板查看如果您能够登录到宝塔面板,可以通过宝塔面板的文件管理功能找到对应的账号密码文件,通常位于/www/server/panel/data/*.login。使用Python脚本查看另外,您还可以通过执行以下命令在SSH终端中查看宝塔面板的账户和密码。cd /www/server/panel python tools.py panel testpasswd通过修改配置文件来重置密码如果上述方法都无法使用,还可以考虑通过数据库工具或直接修改配置文件来重置密码。在操作之前,请务必先备份您的数据,以防意外情况发生。通过数据库重置如果青龙面板的密码存储在数据库中,您可以使用数据库管理工具(如phpMyAdmin或MySQL Workbench)来直接修改密码字段。直接修改配置文件如果密码存储在某个配置文件中,可以直接编辑该文件来重置密码。nano /ql/data/config/auth.json修改文件中的密码字段,保存并退出。总结以上方法提供了不同的途径来解决忘记青龙面板密码的问题。根据您的具体情况选择最合适的方法进行操作。同时,为了避免类似问题的再次发生,建议定期备份重要数据,并记录好自己的账号密码信息。注意事项在执行任何敏感操作之前,请确保您有足够的权限。在尝试重置密码之前,请先备份相关数据。如果您不确定如何操作,请寻求专业人士的帮助。
-
podman推送报错http: server gave HTTP response to HTTPS client 如果你使用的是 v1 格式的配置,将文件中的所有内容替换为以下内容:[registries.search] registries = ['docker.io'] [registries.insecure] registries = ['127.0.0.1:30026']如果你使用的是 v2 格式的配置,将文件中的所有内容替换为以下内容:[registries.search] registries = ['docker.io'] [[registry]] prefix = "docker.io" location = "docker.io" [[registry]] prefix = "127.0.0.1:30026" location = "127.0.0.1:30026" insecure = true
-
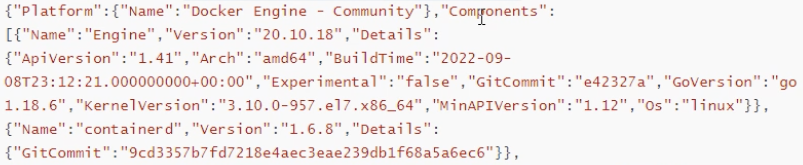
idea集成docker 修改docker.servicevim /usr/lib/systemd/system/docker.service修改ExecStart这一行,开启2375端口远程访问[Unit] Description=Docker Application Container Engine Documentation=https://docs.docker.com After=network-online.target docker.socket firewalld.service containerd.service time-set.target Wants=network-online.target containerd.service Requires=docker.socket [Service] Type=notify # the default is not to use systemd for cgroups because the delegate issues still # exists and systemd currently does not support the cgroup feature set required # for containers run by docker #ExecStart=/usr/bin/dockerd -H fd:// --containerd=/run/containerd/containerd.sock ExecStart=/usr/bin/dockerd -H fd:// --containerd=/run/containerd/containerd.sock -H tcp://0.0.0.0:2375 -H unix://var/run/docker.sock ExecReload=/bin/kill -s HUP $MAINPID TimeoutStartSec=0 RestartSec=2 Restart=always # Note that StartLimit* options were moved from "Service" to "Unit" in systemd 229. # Both the old, and new location are accepted by systemd 229 and up, so using the old location # to make them work for either version of systemd. StartLimitBurst=3 # Note that StartLimitInterval was renamed to StartLimitIntervalSec in systemd 230. # Both the old, and new name are accepted by systemd 230 and up, so using the old name to make # this option work for either version of systemd. StartLimitInterval=60s # Having non-zero Limit*s causes performance problems due to accounting overhead # in the kernel. We recommend using cgroups to do container-local accounting. LimitNOFILE=infinity LimitNPROC=infinity LimitCORE=infinity # Comment TasksMax if your systemd version does not support it. # Only systemd 226 and above support this option. TasksMax=infinity # set delegate yes so that systemd does not reset the cgroups of docker containers Delegate=yes # kill only the docker process, not all processes in the cgroup KillMode=process OOMScoreAdjust=-500 [Install] WantedBy=multi-user.target说明: Intelli] IDEA通过2375端口远程连接到Linux系统中的Docker.重载配置并重启docker服务systemctl daemon-reload && systemctl restart docker3、开放端口firewall -cmd --zone=public --add-port=2375/tcp --permanent && firewall -cmd --reload测试接口curl http://192.168.3.100:2375/version看到类似如下内容[WARNING] No entry found in settings.xml for serverId=docker-mx, cannot configure authentication for that registry出现这个警告是因为settings.xml文件没有配置镜像仓库登录账号密码信息 <plugin> <groupId>com.spotify</groupId> <artifactId>docker-maven-plugin</artifactId> <version>1.2.2</version> <executions> <execution> <id>build-image</id> <phase>package</phase> <goals> <goal>build</goal> </goals> </execution> <!-- <execution>--> <!-- <id>tag-image</id>--> <!-- <phase>package</phase>--> <!-- <goals>--> <!-- <goal>tag</goal>--> <!-- </goals>--> <!-- <configuration>--> <!-- <image>${project.name}</image>--> <!-- <newName>1${project.name}</newName>--> <!-- </configuration>--> <!-- </execution>--> <execution> <id>push-image</id> <phase>deploy</phase> <goals> <goal>push</goal> </goals> <configuration> <imageName>${project.name}</imageName> <imageTags> <imageTag>v${project.version}</imageTag> </imageTags> </configuration> </execution> </executions> <configuration> <!--docker api地址,构建镜像是通过api调用在192.168.245.133上构建,并推送到registryUrl上--> <dockerHost>${docker.remote.host}</dockerHost> <buildArgs> <appName>${project.build.finalName}</appName> </buildArgs> <serverId>docker-mx</serverId> <!--私有仓库地址--> <registryUrl>${docker.registry.url}</registryUrl> <!--镜像名称,必须带仓库地址,否则只会push到docker.io--> <imageName>${docker.registry.url}/${project.name}:v${project.version}</imageName> <imageTags> <imageTag>v${project.version}</imageTag> </imageTags> <!-- 指定dockerfile所在目录 --> <!--<dockerDirectory>${project.build.directory}</dockerDirectory>--> <!--<dockerDirectory>src/main/docker</dockerDirectory>--> <!-- All resources will be copied to this directory before building the image. --> <!--<buildDirectory>${project.basedir}</buildDirectory>--> <!--是否推送镜像--> <!--<pushImage>true</pushImage>--> <!--推送后是否覆盖已存在的标签镜像--> <forceTags>true</forceTags> <!--资源,类似Dockerfile里的 ADD --> <resources> <resource> <!--在生成的docker目录下,新建目录--> <targetPath>/</targetPath> <!--docker-build时生成docker目录位置--> <directory>${project.build.directory}</directory> <!-- <directory>${project.build.directory}</directory>--> <include>${project.build.finalName}.jar</include> <filtering>true</filtering> </resource> </resources> <!--基础镜像--> <baseImage>openjdk:8-jdk-alpine</baseImage> <runs> <run>echo "App is: ${project.name}"</run> <!--<run>mkdir /app</run>--> </runs> <workdir>/app</workdir> <exposes>${profiles.port}</exposes> <!--启动容器里执行的命令:注意这里的格式,格式不对,会运行不成功的--> <!--<entryPoint>["java", "-version"]</entryPoint>--> <entryPoint>["java", "-jar","/${project.build.finalName}.jar"]</entryPoint> </configuration> </plugin>控制台提示报错[ERROR] Failed to execute goal com.spotify:docker-maven-plugin:1.2.2:build (default-cli) on project mxhello: Exception caught: java.io.IOException: Cannot run program "docker-credential-desktop": error=2, No such file or directory -> [Help 1]将 credsStore 改成 credStore ,但是别重启本地docker,否则这一项配置会被清除


您的IP: